Form
- Html에서 유저가 입력한 input를 server로 받아올때 form를 사용합니다.
Types of Angular Forms (2 types)
| Template-Driven Form | Reactive Form | |
|---|---|---|
| Setup | By component | By directives |
| Data Model | Structured | Unstructed |
| Predictability | Synchronous | Asychronous |
| Form Validation | Functions | Directives |
| Mutability | Immutable | Mutable |
Types of Form Building Blocks (4 types)
- FormControl
- 각 ‘form-control’의 value와 validation를 트랙함.
- FormGroup
- form controls 그룹의 value와 validation를 트랙함.
- FormArray
- Array의 form control의 value와 validation를 트랙함.
- ControlValueAccessor
- native DOM element과 Angular FormControl element들을 연결시켜줌.
Template Driven Form Directives (3 directives)
- ngForm
- 모든 form의 담당자
- ngModel
- 각 form의 필드 데이터 담당자
- ngModelGroup
Types of Form Model for Reactive Form (3 types)
- FormControl
- 각 form element를 담당.
- FormGroup
- FormControl들을 담당
- FormBuilder
- Form를 만들어 줌 (Validation를 적용하는 곳)
Form Data Functions
- reset()
- Remove all values from the form
- setValue()
- Set all form to some value
- patchValue()
- Update selected properties of a form model
코드 예시
Goal: Template Driven Form를 만들어 보자!
Step 1: FormsModule 임포트하기
src > app > app.module.ts
1
2
3
4
5
6
7
8
9
10
11
12
13
14
15
16
17
18
19
20
import { BrowserModule } from '@angular/platform-browser';
import { NgModule } from '@angular/core';
import { FormsModule }   from '@angular/forms';

import { AppRoutingModule } from './app-routing.module';
import { AppComponent } from './app.component';

@NgModule({
  declarations: [
    AppComponent
  ],
  imports: [
    BrowserModule,
    AppRoutingModule,
    FormsModule
  ],
  providers: [],
  bootstrap: [AppComponent]
})
export class AppModule { }
- (#3) and (#15): FormsModule를 임포트 해준다
Step 2: Login Form Component 만들기
bash
1
2
$ cd src/app
$ ng g c template-form
- app 디렉토리로 변경 후 template-form component를 만들어 준다
Step 3: app.component.html
src > app > app.component.html
1
<app-template-form></app-template-form>
- (#1): 홈 화면에 template-form component가 보여지게 한다.
Step 4: template driven form setup
src > app > template-form > template-form.component.ts
1
2
3
4
5
6
7
8
9
10
11
12
13
14
15
16
17
18
19
20
21
22
23
24
25
26
27
import { Component, OnInit } from '@angular/core';
import { NgForm } from '@angular/forms';

@Component({
  selector: 'app-template-form',
  templateUrl: './template-form.component.html',
  styleUrls: ['./template-form.component.css']
})
export class TemplateFormComponent implements OnInit {

  userLoginForm = {
    name: "",
    email: "",
    phone: "",
    password: "",
    confirm_password: ""
  };

  constructor() { }

  ngOnInit(): void {
  }

  onSubmitForm(formData: NgForm) {
    console.log(formData)
  }
}
- (#2): NgForm 인포트
- (#11-17): 유저가 입력한 value들을 저장할 곳
- (#24-26): 유저가 submit 버튼을 눌으면 브라우져의 콘솔에서 입력한 value를 확인하기 위한 함수
Step 5: template driven form 템플릿 만들기
src > app > template-form > template-form.component.ts
1
2
3
4
5
6
7
8
9
10
11
12
13
14
15
<h1>Template Driven Login Form</h1>
<form (ngSubmit)="onSubmitForm(f)" #f="ngForm">
  <input type="text" placeholder="Name" class="form-control" name="userName" [(ngModel)]="userLoginForm.name"/>
  <br>
  <input type="email" placeholder="Email" class="form-control" name="userEmail" [(ngModel)]="userLoginForm.email"/>
  <br>
  <input type="number" placeholder="Phone" class="form-control" name="userPhone" [(ngModel)]="userLoginForm.phone"/>
  <br>
  <input type="password" placeholder="Password" class="form-control" name="userPassword" [(ngModel)]="userLoginForm.password"/>
  <br>
  <input type="password" placeholder="Confirm Password" class="form-control" name="userConfirmPassword" [(ngModel)]="userLoginForm.confirm_password"/>
  <br>
  <button type="submit">Submit</button>
  <button type="reset">Clear</button>
</form>
- (#2): f라는 variable를 만들고 그 value를 ngForm이랑 연결시킨뒤 submit를 했을때 아까 만든 함수가 발동되게 합니다.
- (#3-11): 각 하나의 formControl를 담당하고 있습니다.
(주의: name=”SOMEVALUE”와 [(ngModel)] 꼭 필요!) - (#13-14): 각각 submit과 reset를 담당하는 버튼입니다.
Result
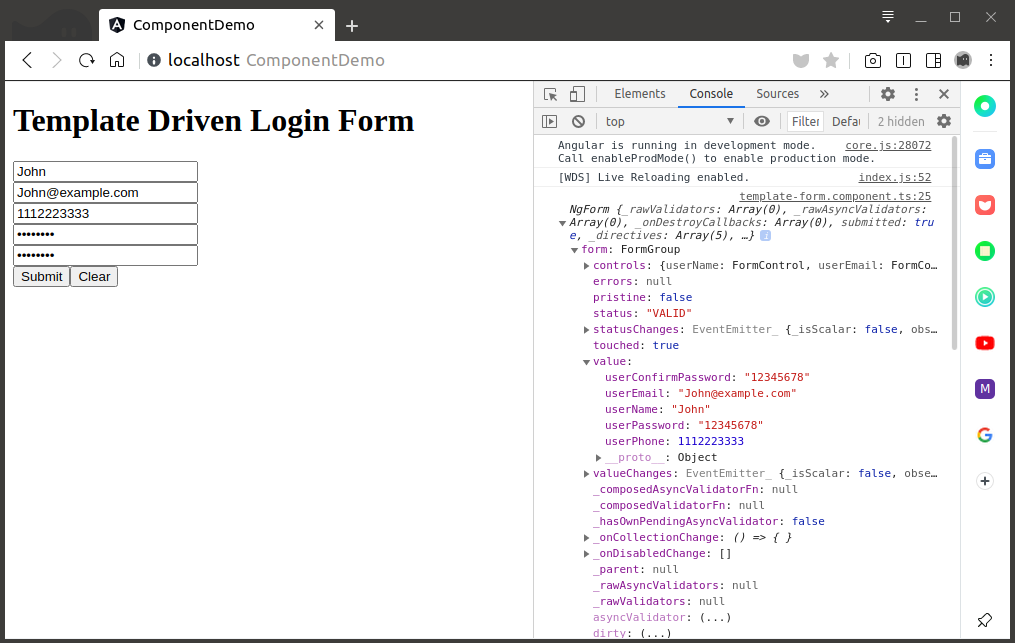
- Terminal에서
ng serve를 이용하여 브라우저에서 결과를 확인한다. - value 입력 후 submit 버튼을 누르면 브라우져 콘솔에서 입력한 value가 나오는 것을 확인한다
코드 예시 2
Goal: Reactive Form를 만들어 보자!
Step 1: FormsModule 임포트하기
src > app > app.module.ts
1
2
3
4
5
6
7
8
9
10
11
12
13
14
15
16
17
18
19
20
21
import { BrowserModule } from '@angular/platform-browser';
import { NgModule } from '@angular/core';
import { FormsModule, ReactiveFormsModule }   from '@angular/forms';

import { AppRoutingModule } from './app-routing.module';
import { AppComponent } from './app.component';

@NgModule({
  declarations: [
    AppComponent
  ],
  imports: [
    BrowserModule,
    AppRoutingModule,
    FormsModule,
    ReactiveFormsModule
  ],
  providers: [],
  bootstrap: [AppComponent]
})
export class AppModule { }
- (#3) and (#16): ReactiveFormsModule를 임포트 해준다
Step 2: Login Form Component 만들기
bash
1
2
$ cd src/app
$ ng g c reactive-form
- app 디렉토리로 변경 후 reactive-form component를 만들어 준다
Step 3: app.component.html
src > app > app.component.html
1
<app-reactive-form></app-reactive-form>
- (#1): 홈 화면에 reactive-form component가 보여지게 한다.
Step 4: reactive form setup
src > app > reactive-form > reactive-form.component.ts
1
2
3
4
5
6
7
8
9
10
11
12
13
14
15
16
17
18
19
20
21
22
23
24
25
26
27
28
29
30
import { Component, OnInit } from '@angular/core';
import { FormControl, FormGroup, FormsModule } from '@angular/forms';

@Component({
  selector: 'app-reactive-form',
  templateUrl: './reactive-form.component.html',
  styleUrls: ['./reactive-form.component.css']
})
export class ReactiveFormComponent implements OnInit {

  userLoginForm = new FormGroup({
    name: new FormControl(''),
    email: new FormControl(''),
    phone: new FormControl(''),
    passwordsGroup: new FormGroup({
      password: new FormControl(''),
      confirm_password: new FormControl('')
    })
  })

  constructor() { }

  ngOnInit(): void {
  }

  onSubmitForm() {
    console.log(this.userLoginForm.value)
  }

}
- (#11-19): Reactive Form를 만들어 준다 (FormBuilder 만드는건 다음 포스트에서 form-validation과 함께)
- (#26-28): 유저가 submit 버튼을 눌으면 브라우져의 콘솔에서 입력한 value를 확인하기 위한 함수
Step 5: reactive form 템플릿 만들기
src > app > reactive-form > reactive-form.component.ts
1
2
3
4
5
6
7
8
9
10
11
12
13
14
15
16
17
<h1>Reactive Login Form</h1>
<form [formGroup]="userLoginForm" (ngSubmit)="onSubmitForm()">
  <input type="text" placeholder="Name" formControlName="name"/>
  <br>
  <input type="email" placeholder="Email" formControlName="email"/>
  <br>
  <input type="number" placeholder="Phone" formControlName="phone"/>
  <br>
  <div formGroupName="passwordsGroup">
    <input type="password" placeholder="Password" formControlName="password"/>
    <br>
    <input type="password" placeholder="Confirm Password" formControlName="confirm_password"/>
    <br>
  </div>
  <button type="submit">Submit</button>
  <button type="reset">Clear</button>
</form>
- (#2): [formGroup]를 아까 만든 formGroup과 연결해준다
- (#3-7): formControlName를 아까 만든 FormControl들과 이름이 같게 연결한다
- (#9): 패스위드들을 위한 FormGroup은 따로 만들었기 때문에 div tag로 패스워드들을 감싸준다
Result
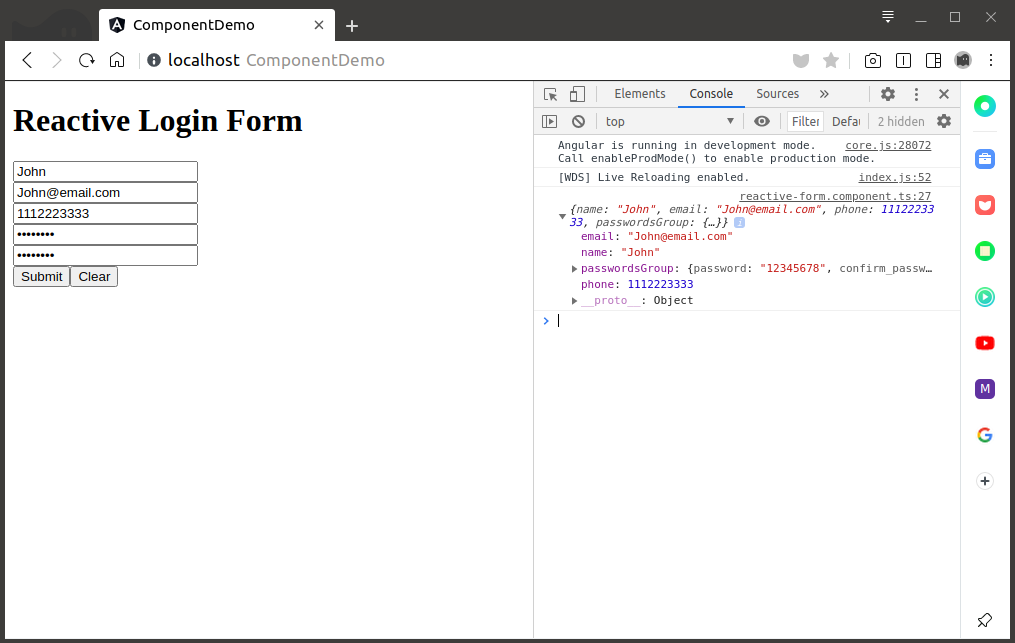
- Terminal에서
ng serve를 이용하여 브라우저에서 결과를 확인한다. - value 입력 후 submit 버튼을 누르면 브라우져 콘솔에서 입력한 value가 나오는 것을 확인한다