What is a pipe
- 파이프는 템플렛에 보여지는 data의 형식을 바꿔준다
- Syntax:
- Example:
- name에 있는 모든 알파벳이 대문자가 되어서 보여진다
Built-in Pipes
String Pipes
| Syntax | Description | |
|---|---|---|
{{ string_value | lowercase}} |
String를 소문자로 바꾼다 | |
{{ string_value | uppercase}} |
String를 대문자로 바꾼다 | |
{{ string_value | titlecase }} |
모든 단어의 첫 글자는 대문자로 다른 글자들은 소문자로 다 바꾼다 | |
{{ string_value | slice:start[:end] }} |
String를 한 부분만 보여준다 Ex: {{ "Hello World" | slice:5:9 }} |
|
{{ string_value | json }} |
해당 string를 json포멧으로 보여준다 |
Number Pipe
| Syntax | Description | |
|---|---|---|
{{ number_value | number[:'digits']}} |
숫자를 소수로 바꾼다 EX: {{ 3.14159265359 | number:'1.4-6}} Output: 3.141592 |
|
{{ number_value | percent}} |
숫자를 퍼센트로 바꾼다 | |
{{ number_value | currency:'currencyname'}} |
숫자를 화폐로 바꾼다
EX: {{ 1000 | currency:'USD'}}
Output: $1000 |
|
{{ number_value | date:format}} |
숫자를 날짜로 바꾼다 |
Chaining Pipes and Custom Pipes
- Chaining Pipes:
- 여러게의 파이프를 연결하는 것
- EX:
{{ string_value | uppercase | slice:10:20 }} - 늘 파이프는 자기자신의 앞에 있는 것을 바꾼다.
- 늘 파이프는 왼쪽에서 오른쪽으로 읽는다
- Custom Pipes
- 개발자가 직접 pipe를 제작한다
- 코드 예시를 보자!
** 더 많은 pipe는 엥귤러 공식 페이지에서 확인! https://angular.io/api?type=pipe **
코드 예시
Goal: Custom Pipe를 만들어 보자! 준비물: 새 프로젝트와 Component 하나
Step 1: Open Terminal
terminal
1
2
3
4
5
# inside of your project folder
mkdir src/app/pipes
cd src/app/pipes
# ng generate pipe <custom_pipe_name>
ng generate pipe custompipe
- pipes라는 폴더를 만든다
- pipes라는 폴더 안에 custompipe 이라는 pipe를 만든다
Step 2: App Component에 리스트 만들기
src > app > app.component.ts
1
2
3
4
5
6
7
8
9
10
11
12
13
14
15
16
17
18
19
20
21
22
23
24
25
26
27
28
29
import { Component } from '@angular/core';

@Component({
  selector: 'app-root',
  templateUrl: './app.component.html',
  styleUrls: ['./app.component.css']
})
export class AppComponent {
  title = 'componentDemo';

  shoppingList: any[] = [
    {
      "name": "Lamp",
      "price": 1000
    },
    {
      "name": "Book",
      "price": 2000
    },
    {
      "name": "Radio",
      "price": 3000
    },
    {
      "name": "Phone",
      "price": 4000
    }
  ]
}
- shoppingList를 위와 같이 만든다.
Step 3: Custom Pipe 만들기
src > app > pipes > custompipe.pipe.ts
1
2
3
4
5
6
7
8
9
10
11
12
13
14
15
16
17
18
19
20
21
import { Pipe, PipeTransform } from '@angular/core';

@Pipe({
  name: 'custompipe'
})
export class CustompipePipe implements PipeTransform {

  transform(value:any, search:string): any {
    if(value.length === 0 || search === "" ) {
      return value
    }
    const result = []
    for (const element of value) {
      if (element.price > +search) {
        result.push(element)
      }
    }
    return result
  }

}
- 해당 function를 만들어 준다
- function = 유저가 입력한 숫자보다 큰 가격을 가진 아이템을 리턴하다
- 파이프 이름을 외운다
- name: ‘custompipe’
- name: ‘custompipe’
Step 4: App Html
src > app > app.component.html
1
2
3
4
5
Price Greater Than: <input type="text" [(ngModel)]="search">

<ul *ngFor="let product of shoppingList | custompipe:search">
    <li> - </li>
</ul>
- Input Box에 숫자를 입력하면 해당 price보다 높은 아이템들을 보여준다
Result
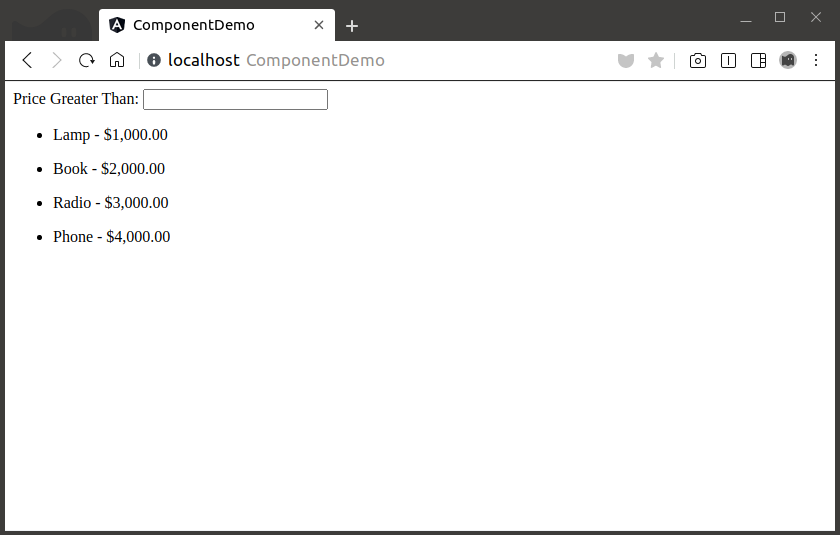
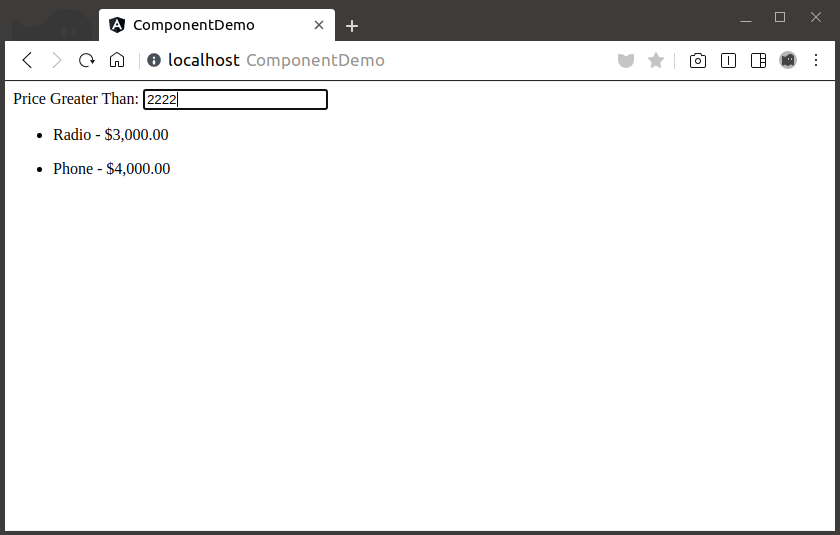
- Terminal에서
ng serve를 이용하여 브라우저에서 결과를 확인한다.
Extra (Pure Pipe and Impure Pipe)
- Pure Pipe
- Pipe에 변화가 감지되었을 때 발동
- Impure Pipe
- 다른 Component가 바꿨을 때도 발동
- Pipe name 아래에
pure:false삽입