Directives 이란
- 텟플릿을 레더링할 때 directives의 정해진 룰로 정보를 보여준다
- 만약 ‘1000’를 달러로 보여주고 싶을때 directive를 이용하여 ‘$1000’을 보여줄 수 있다.
Types of Directives (4가지)
- Components
- Component은 텟플릿이 있는 Directive이다
- Structural Directives
- DOM에서 컨디셔널 레더링이나 list를 for loop를 이용해 구현할 수 있게 도아준다
- *ngIf, [ngSwitch], *ngFor
- Attribute Directives
- HTML attributes를 Directive으로 할당한다.
- Custom Directives
코드 예시
Goal: *ngIf 사용해 보기
준비물: 새 프로젝트와 Component 하나
*ngIf, *ngFor, [ngSwitch]
Step 1:
1
2
3
4
5
6
7
8
9
10
11
12
13
14
15
16
17
18
| import { Component, EventEmitter, OnInit, Output } from '@angular/core';
@Component({
selector: 'app-my-first-component',
templateUrl: './my-first-component.component.html',
styleUrls: ['./my-first-component.component.css']
})
export class MyFirstComponentComponent implements OnInit {
public item1!:string;
constructor() { }
ngOnInit(): void {
this.item1 = "Item One"
}
}
|
- Component의 ts 파일을 연다 (src > app > my-first-component > my-first-component.component.ts)
Step 2:
1
2
3
| <div *ngIf="item1">
<p>Item One Exist</p>
</div>
|
- Component의 html 파일을 연다 (src > app > my-first-component > my-first-component.component.html)
- Terminal에서
ng serve를 이용하여 브라우저에서 결과를 확인한다.
- 만약 “Item One Exist”이 보인다면 성공!
*ngIf (#truecodition과 #falsecondition 이용하기)
Step 1:
1
2
3
4
5
6
7
8
9
10
| <div *ngIf="item1 === 'Item One'; then trueCondition; else falseCondition">
</div>
<ng-template #trueCondition>
<p>Item One Exist</p>
</ng-template>
<ng-template #falseCondition>
<p>No item found</p>
</ng-template>
|
- Component의 html 파일을 연다 (src > app > my-first-component > my-first-component.component.html)
- Terminal에서
ng serve를 이용하여 브라우저에서 결과를 확인한다.
*ngFor
Step 1:
1
2
3
4
5
6
7
8
9
10
11
12
13
14
15
16
17
18
19
20
21
22
| import { Component, EventEmitter, OnInit, Output } from '@angular/core';
@Component({
selector: 'app-my-first-component',
templateUrl: './my-first-component.component.html',
styleUrls: ['./my-first-component.component.css']
})
export class MyFirstComponentComponent implements OnInit {
public itemList!: any[];
constructor() { }
ngOnInit(): void {
this.itemList = [
{"name": "Lamp", "color": "Gold"},
{"name": "Book", "color": "Blue"},
{"name": "Kite", "color": "Red"},
{"name": "Pear", "color": "Green"}
]
}
}
|
- Component의 ts 파일을 연다 (src > app > my-first-component > my-first-component.component.ts)
Step 2:
1
2
3
4
5
| <ul *ngFor="let item of itemList">
<li>
-
</li>
</ul>
|
- Component의 html 파일을 연다 (src > app > my-first-component > my-first-component.component.html)
- 위의 코드를 html 파일에 넣는다.
Result
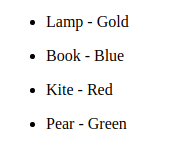
- Terminal에서
ng serve를 이용하여 브라우저에서 결과를 확인한다.
ngSwitch
Step 1:
1
2
3
4
5
6
7
8
9
10
11
12
13
14
15
16
17
18
19
20
21
22
| import { Component, EventEmitter, OnInit, Output } from '@angular/core';
@Component({
selector: 'app-my-first-component',
templateUrl: './my-first-component.component.html',
styleUrls: ['./my-first-component.component.css']
})
export class MyFirstComponentComponent implements OnInit {
public itemList!: any[];
constructor() { }
ngOnInit(): void {
this.itemList = [
{"name": "Lamp", "color": "Gold"},
{"name": "Book", "color": "Blue"},
{"name": "Kite", "color": "Red"},
{"name": "Pear", "color": "Green"}
]
}
}
|
- Component의 ts 파일을 연다 (src > app > my-first-component > my-first-component.component.ts)
Step 2:
1
2
3
4
5
6
7
8
9
10
11
12
13
14
| <ul *ngFor="let item of itemList" [ngSwitch]="item.name">
<li *ngSwitchCase="'Lamp'">
This Lamp is
</li>
<li *ngSwitchCase="'Book'">
This Book is
</li>
<li *ngSwitchCase="'Kite'">
This Kite is
</li>
<li *ngSwitchDefault>
Item unknown
</li>
</ul>
|
- Component의 html 파일을 연다 (src > app > my-first-component > my-first-component.component.html)
- 위의 코드를 html 파일에 넣는다.
Result
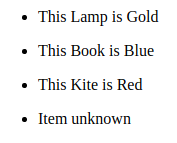
- Terminal에서
ng serve를 이용하여 브라우저에서 결과를 확인한다.
Attribute Directives는 다음 포스트에서