On This Page
Components 이란
Components 이란 템플렛 뷰 (html과 css)와 비지니스 로직 (TypeScript)이 합쳐진 것 입니다. 각각의 Component는 웹페이지에 보여질 작은 화면들을 만들어 내고, 만들어진 Component들이 모여서 하나의 웹페이지를 브라우져를 통하여 보여주게 됩니다.
좋은 점
- 로직과 스타일을 다시 사용하기 편하다
- 스크린을 파트 별로 나누기 좋다
- 병합하기 편리하다
- Component를 새로 만들거나 업데이트하기 쉽다
코드 예시
Goal: Component를 만들어 보고 browser에서 확인하기!
Step 1: 먼저 새로운 프로젝트를 만들도록 하겠습니다. Terminal를 열어서 프로젝트를 만들고 싶은 곳에 아래 커맨트를 입력합니다.
1
$ ng new componentDemo
Step 2:


- y를 입력과 엔터 후, CSS를 선택하고 엔터를 눌러주세요.
Step 3:
방금 만든 프로젝트의 app 디렉토리로 들어가서 my-first-component 만들도록 하겠습니다.
1
2
$ cd ./componentDemo/src/app
$ ng generate component my-first-component
Note: Component 단축 커멘드
1
$ ng g c my-first-component
Step 4:
4개의 파일들이 만들어지고 1개의 파일을 업데이트 합니다.

- y로 routing 선택 후, CSS 선택
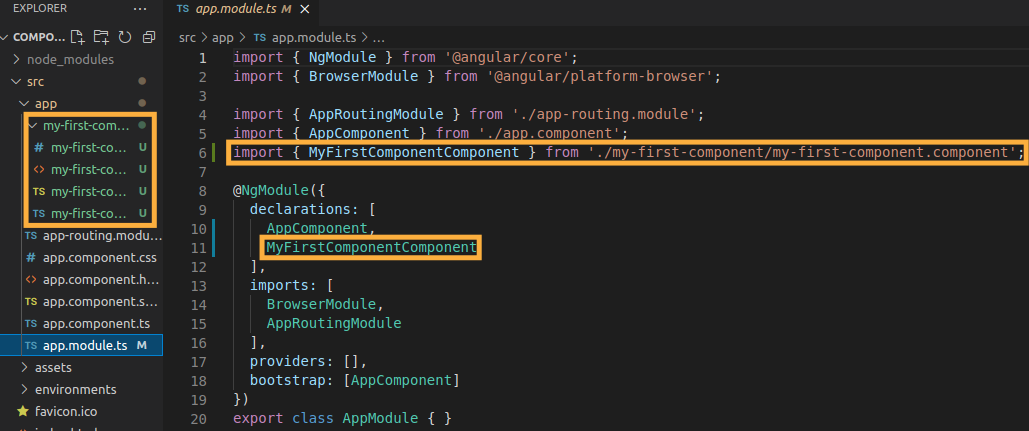
- 만들어진 4개의 파일은 새로운 component의 파트에 추가 된 것이고,
- my-first-component.ts: component의 로직 파일
- my-first-component.css: component의 스타일 파일
- my-first-component.html: component의 템플릿 파일
- 업데이트 된 1개의 파일은 app.moudle.ts에 새로운 component가 import 된 것을 알려준 것 입니다.
Step 5:
Component의 Selector 확인하기
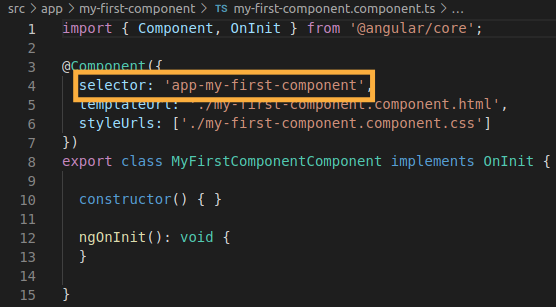
- src/app 디렉토리에 들어가서 my-first-component.ts의 selector를 확인합니다.
- Selector를 html tag처럼 이용하여 component를 html 파일에 넣을 수 있습니다.
- <app-{name_of_selector}></app-{name_of_selector}>
- 예시: <app-my-first-component></app-my-first-component>
Step 6:
Component를 브라우저에 띄우기

- src > app > app.component.html 안에 있는 모든 코드를 지우고 <app-my-first-component></app-my-first-component>를 씁니다.
- 다 저장한 후 terminal에서 아래 커멘트를 실행합니다.
1
$ ng serve --open
Step 7:
Component 브라우져에서 확인하기

- 브라우져가 자동 실행되지 않았다면 localhost:4200를 주소창에 넣고 실행해주세요
- 만약 my-first-component works가 보여진다면 성공!